|
|
|
A FTP server is a way off sharing files with other people on the internet. You setup a FTP server and other people can download files you have on your harddisk. This provides you with an easy way off sharing files. A FTP Server allows Uploading which means a user is sending files to your FTP Server and Downloading which means a user is transfering files from your FTP Server.
If you ask around everybody has a different program for setting up a FTP server. Some people use the standard one which is included with Windows NT 4.0 and Windows 2000 Server & Advanced Server. But that way will be shot down by most people. The best programs you can find around are: Serv-U FTP Server, WarFTP and G6 FTP Server. I like the last one, I have been working with Serv-U but find G6 to be much more stable and configurable.
Download Serv-U FTP Server: ftp://ftp1.deerfield.com/pub/current/susetup.zip
Download WarFTP Deamon: http://www.escalix.com/mirror/jgaa/files/ward165.exe
Download G6 FTP Server: http://www.gene6.com/files/ftpsetup.exe
** For now download G6 FTP Server from the link above **
Download the
executable file and place it inside a temp directory on your harddisk. Then
double click on ftpsetup.exe to start the installation program.
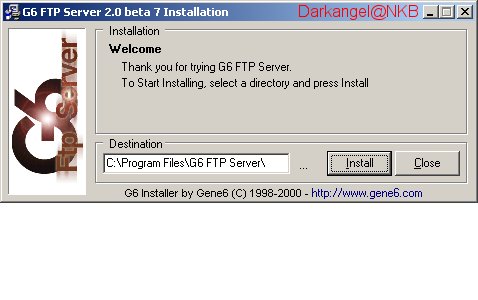
Click on the 3 … to change the directory where G6 FTP
Server is going to be installed. Click on Install to install G6 FTP Server.
A little screen will popup asking you if you agree to
create the installation directory. Press Yes. It's like Microsoft damn another
question, do you wish to create a desktop icon. This is really your own choice I
personally don't like my desktop filled with icons so I would click No but this
one is up to YOU!! Click Yes and you'll have a nifty shortcut inside your start
menu.
OK I assume I don't have to show the last message. Cause
it asks you if you would like to start the program right now. Click on Yes
** Installation of G6 FTP Server Completed **
Just follow
the screenshots and descriptions to configure G6 FTP Server in a good, easy and
secure way. If you open the setup screen by clicking on the cog icon.
You will then see a screen like this:
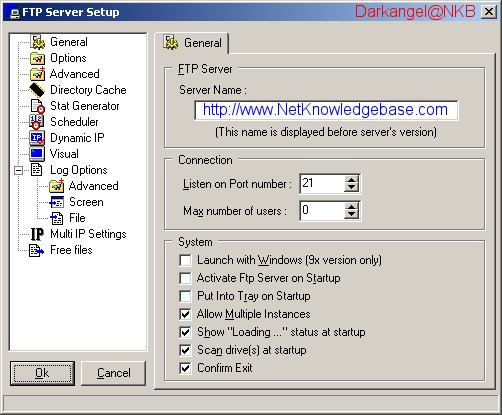
This is the General setup screen from which you can
change and tweak the whole FTP Server.
Type in a good name inside the Server Name field.
You have to setup your FTP server on whatever port you
like inside the Listen on Port number field. I would suggest you take a port
other then 21 because port 21 is being used most of the time and is acording to
rumors being scanned by your ISP.
The other tickboxes under System I would all leave
ticked expect the Allow Multiple Instances that might crash your PC or Server.
On my Server I have also ticked the Activate Ftp Server on Startup box and the
Put Into Tray on Startup box. This toghetter with an icon in you startup folder
starts en minimizes the FTP Server during boot of your computer.
Now click on Options on the left part from the
Configuration Panel. The following screen shows us the options panel:
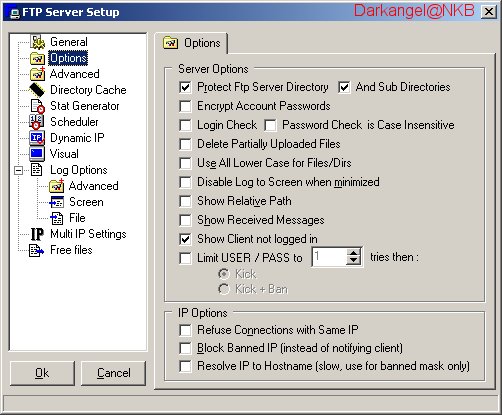
Leave the Protect Ftp Server Directory & And Sub
Directories always ticked so that users can't go up from the FTP Server root
directory.
I always tick the Encrypt Account Passwords just to be
on the safe side and man it can't be safe enough in this world.
Don't tick the Login Check box cause it won't do you any
good I've seen it fail many many times, and it didn't allow people to log in
properly.
Tick the Show Relative Path directory so that users will
see the path of your FTP Server as / instead of something like /D:/. This gives
a more professional look to the server.
I would tick the Show Client not logged in box just to
have a bit more information of who is trying to connect or has connected to your
server.
Tick the Limit USER / PASS to X amount of times then:
Kick, I always set it to 3 cause that is like a standard
in the User/Pass settings.
Under the IP Options I tick the Refuse Connections with
Same IP box mainly cause my upstream is not the worlds greatest and also cause I
don't want people logged in twice from the same IP that leaves another position
open for other users…
Be sure to tick the Block Banned IP (instead of
notifying client) box cause people shouldn't mess with the server so if they get
banned it's their own fault.
You can if you want tick the Resolve IP to Hostname
(slow, use for banned mask only) but it can't always resolve the hostname plus
like they mention it slows down the server.
Now click on Advanced on the left part from the
Configuration Panel. We are going to configure some Advanced options and the
screen looks like this:
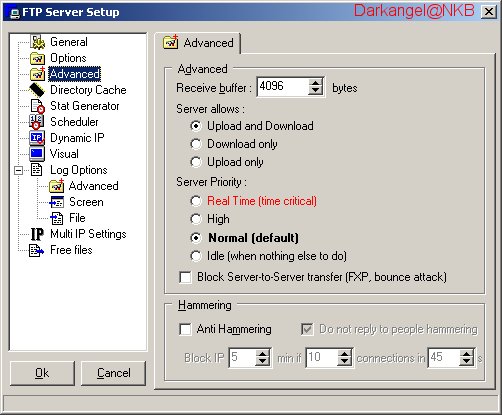
Better leave the Receive buffer alone unless you have a
pretty fast connection and a pretty fast server.
You can set the Server allows to whatever setting you
like but I want them to do both so I'll leave it at Upload and Download.
Whatever you do don't set the Server Priority to Real
Time (time critical) cause it will slowly mess up your server.. Seriously don't
set it to Realtime cause it's a way to hard hit on you server.
You can tick the Block Server-to-Server transfer (FXP,
bounce attack) option but that also doesn't allow you to FXP software to your
own server from another FTP Server.
We'll finaly we have landed at the Hammering options. I
don't like people hammering my server so I always set these options. If you want
this also then tick the Anti Hammering box and the Do not reply to people
hammering option is automaticaly ticked also. I would set the Block IP setting
to 15 Minutes cause then they get a bit mad and they probably won't try it again
next time. Yeah the If XX connections in XX seconds is totally up to you but I
think a 5 second wait and then a retry is a bit to much for a simple home FTP
server. That means my server will block them like the screenshot shows. But this
setting is again totally up to you.
Now click on Directory Cache on the left part from the
Configuration Panel. Like the option tells ya it's all about Directory Cache
look at the screenshot below:
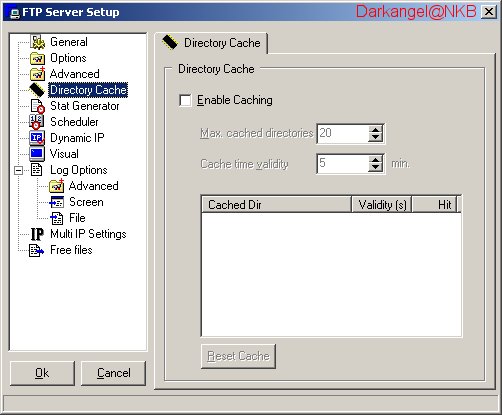
If you have a really fast connection you might not need
this but it can decrease disk activity if loads of users log on and request a
directory list. To enable disk caching simply tick the Enable Caching box. You
can set the maximum cached directory and the time validty. But you guessed it
again this is totally up to you. The cached directories the users have access to
is shown inside the white box.
You can play around with the Stat Generator and the
Schdeduler but I don't think they have anything important to do unless you want
the whole process autmaticaly to start and shutdown at certain times. Just have
a play with this setting.
Now click on Dynamic IP on the left part from the
Configuration Panel. This is a very cool option and helps you automaticaly if
you have a Dynamic IP assigned by your Internet Provider.
Let's view the Dynamic IP properties.
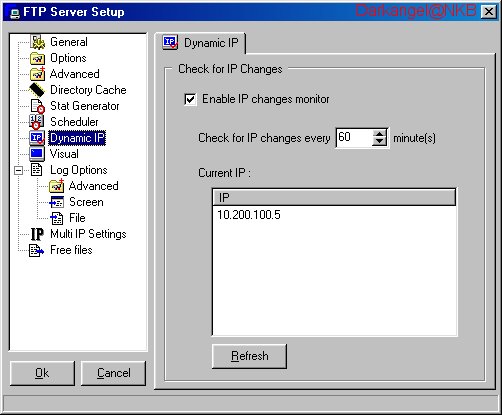
To enable G6 FTP Server to monitor IP changes click the
Enable IP changes monitor. Now you need to change the Check for IP changes every
XX minutes. I would set it to 60 minutes to not cause to much impact on the
system. Thus if you're IP changes your server will be offline for only 60
minutes then it will change to use the new IP. But more on that at another
option. The Current IP box shows you the IP address of your network card. If you
have two network cards like I use in my server you will see your external IP
(Which your ISP assigns) and your internal IP from the other network card.
Now click on Log Options on the left part from the
Configuration Panel.
Yeah, let's configure the Log Options. Don't actualy
need this unless you want to track some thing special. This option can be
usefull if you need to track the users, normaly this is the case when you have a
company FTP server. I don't really use this cause I don't allow anonymous
connections. If you want to allow anonnymous connections then this can be a very
handy tool.
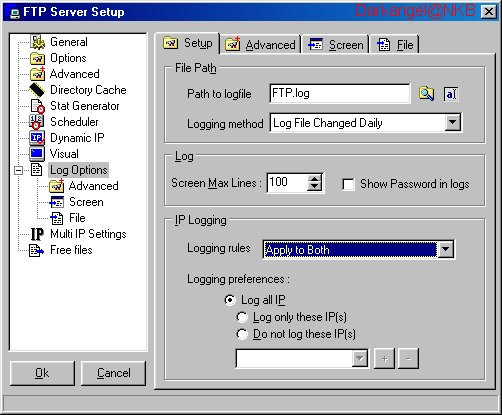
If you really need to have a good logging system then
you better change the Logging method to Log File Changed Daily this gives you a
good overview off who logged in and did what on that day. I would recommend you
create a directory called FTP-LOGS on your server somewhere. Then point the Path
to logfile to that directory and start logging. You can then view them on a
regular basis and delete the log files you don't longer want to keep.
The other log options speak for themselves. They allow
you to select what you want to have logged and how. Click on the corresponding
tab. The Screen tab allows you to select what options you want to have displayed
on screen. The File tab allows you to select what options you want to have
logged into the log file you've selected.
Now click on Dynamic IP on the left part from the
Configuration Panel. Let's configure the Multi IP Setting option which works
toghetter with the Dynamic IP. If you enable both your Server will switch IP's
when your Internet Provider assigns you another IP. Let's look at the possible
options for the Multi IP Setting.
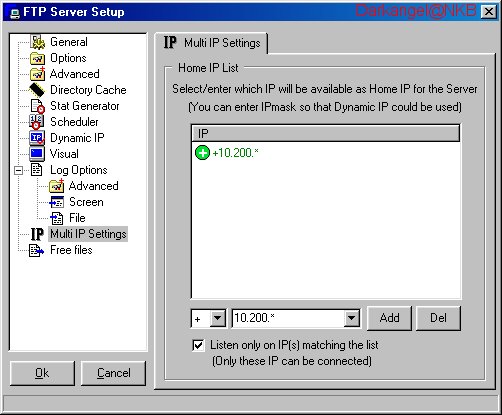
This option is indeed very handy if you have a Dynamic
IP from your Internet Provider. From the pulldown list in the bottom select the
IP you wish to use for Multi IP then remove either the last digits or the last
two sets off digits and type a star. (10.200.100.5 becomes either 10.200.100* or
10.200.*) Then select the Listen only on IP(s) box to make sure the server only
listens on the IP's entered inside the list. If you wish to change your internal
IP then this setting will have no effect on the server. Only if your external IP
changes, this means the IP from your Internet Provider filled into the IP list.
Now click on Free Files on the left part from the
Configuration Panel.
The Free Files option is only usefull if you want to
setup a RATIO FTP Server. Which I personaly don't like. You use your FTP server
to provide files to other people or allow other people to upload files for you.
Nonetheless I'll explain how this option works.
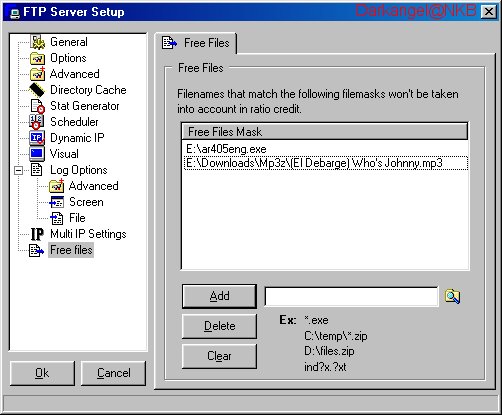
Yeah yeah, quit complaining I know the MP3 file is 80
music. But that's the time I grew up in J. Now in here you can set which files
can be freely downloaded from your server. In this case I choose only two. But
you can also setup masks which can include all ZIP files from a certain
directory. So you for instance you limit the MP3 File directory but give
everybody full download to the Upload directory. Everything is possible with
this option.
** Configuration of G6 FTP Server Completed **
This section
of this tutorial shows you how to setup user and group accounts. The group
account can make life much easier, think off groups like you use on Windows NT
or Unix. Then you can bind a user account to a group allowing this user all the
rights granted to the specified group he now belongs to. Follow the screenshots
plus explenation to learn more on this subject.
Click on the people icon to open the Group screen.
The first time you click on this little button G6 brings
up the following screen:

Just click on OK cause we are gonna walk through the
whole setup process anyway. Read it if you really must, but it doesn't show you
anything not being handled inside this tutorial.
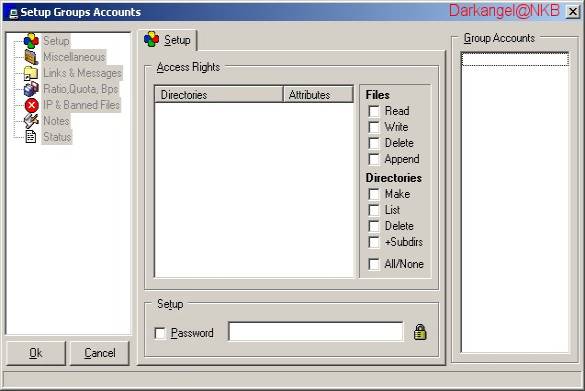
This screen allows you to setup group accounts, these
groups can be used to assign users to. Thus allowing you to only once set the
rights for the group. Every user added to the group will get the same rights as
all the other users who belong to that group. Think of a group system like used
on Windows NT and Linux/Unix.
Let start to create our first group.
Right click in the Group Accounts box on the right off
the screen, this shows you a little box. Click on Add (Or use the Insert key) to
add a new group account. Then you will have to type in the group name into the
following screen:
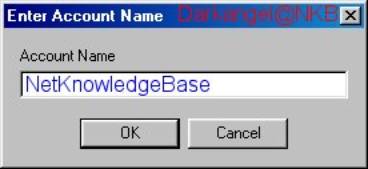
Fill in for this example Standard Users which I always
use for normal access to my FTP server, click on OK. Then we need to give access
rights to directory's. To accomplish this right click in the Access Rights field
and browse for a directory. Remember the first directory you select is the users
Home directory. That's why I always select the root FTP directory first and give
them read and list rights and also +Subdirs. Read Rights give them access to
read the files and List Rights allow them to create a directory list the +Subdir
options inherits the rights for all subdirectory's unless you specify
differently. Which you all need in order for them to view and read the
directory's. Then I normaly allow them Read Rights, Make Directory and List
Directory rights on a Reuqest directory so they can request a file or program.
This setup is totally up to you but now you know how it works.
We still have some additional configuration we can apply
to a group account you'll find this under the miscellaneous tab on the left.
Select this option and the following screen will be visible:
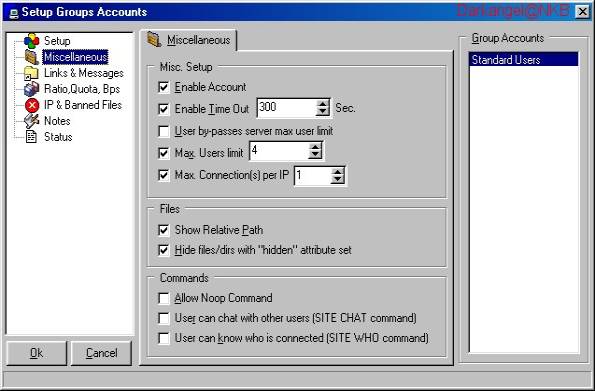
Make sure you always tick the Enable Account option for
this group account to work. You can if you want set the Enable Time Out option,
I always tick it for users who don't do anything anymore. Unfortunately with all
the options inside FTP programs you can't block this good enough and it's merely
an option for the dumb FTP users amongst us to kick them if they are idle. I
usually set this to either 120 seconds or 180 correspondingly 2 or 3 minutes. If
you have a super amount of speed available for your FTP server you can set the
Max Users Limit to a much higher rate. I have only 15KB available for Upstream
thus I would set it to a much lower rate. Standard I would say leave it between
5 and 8 to allow a good amount off users onto your system. To be fair for all
users I always tick the Max Connection(s) per IP and make sure users can only
connect once from each IP. Thus allowing 8 physical users and not 2 users with 4
sessions. If you have a company FTP server and have like 2MBIT upstream
available we are talking about a complete different setup and you can set this
to an amount of 3 or 4 depending on your choice. When I connect to an FTP server
I always like to see the / prompt instead off /D:/. The / looks much more
professional, to accomplish this tick the Show Relative Path option. Because in
this example we are talking about the Standard User group I don't want them to
see all the hidden files and folders I might have setup for my Power Users
group, select this option if you'd like. On the Commands section I normally turn
off every option, simply because it has no use. The Links & Messages option
on the left side from the Group screen is handy if you would like to have a
welcome greeting. Play with this if you'd like and try it out. The other options
are for RATIO FTP's which I won't explain here simply because I don't like RATIO
FTP servers.
** Let's continue to the User account setup **
If you click
on the little icon to open the user account screen. A similar screen shows up
like on the group accounts. Just click on OK to continue. This screen will now
be visible:
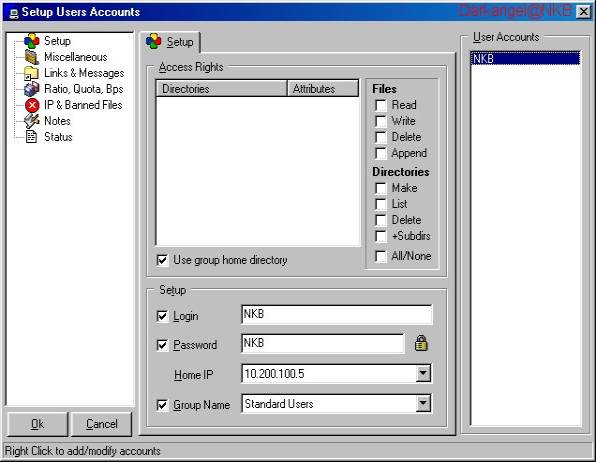
Like in the group accounts creation right click in the
User Accounts box and click on Add. Type in the name off the user in the popup
screen. Next thing to do is to change the Password you can type in anything you
want. Also change the Home IP to match the IP of your network card connected to
the Internet. Next we want this user to belong to a group so we tick the Group
Name box and click on the pulldown box. This shows all the groups created on
this server. Select the appropriate group. Also click the Use group home
directory so that this user picks up all the Access Rights from the group.
** You're all Set !!! You have created your first User/Group account **
To setup files and directory's in a secure way you need to run this server on a good operating system. This can be either Linux/Unix or Windows NT/2000 these systems allow you to set file and directory permissions. These can affect the use off the FTP server. On the FTP server you set the Protect FTP Server Directory option, but I normally don't take that as enough. So you set the directory permissions on your operating system. On a Linux/Unix machine you use the CHMOD command to change directory permissions. There are numerous websites around to tell you how to do this. On a Windows NT/2000 system you use the NTFS security system to prevent unauthorized users from changing to other directory's.
First you need to start the FTP server. You can start and stop the FTP server at any time by clicking on the little Lightning Icon this enables or disables the FTP server. Open a FTP program, this can be either FlashFXP or CuteFTP doesn't really matter. Now create a new connection and fill in all the details from your FTP, this means the IP address plus the user account and password. Then click on connect and alakazam you are on your own FTP server. This concludes this tutorial, hope it was helpful.